KO Moto Setup Guide

Screenshot_2_copy1

Welcome to the KO Motor & Controller Setup Guide by GritShift. By the end you’ll have your KO setup installed, tuned, and ripping, even if you’ve never done anything like this before!


With this guide you will:

  • Install your new KO parts
  • Download the KO Tuning Software
  • Update the controller firmware
  • Create a working baseline tune for your bike
  • Explore optional fine tuning parameters

Grab a drink, grab your tools, and let’s get this party started!


📲 📲 KO MOBILE APP IS OUT NOW! (BETA) This app makes tuning a breeze!
Bullet unboxing and installing a KO Motor and Controller on a Sur Ron
How to connect to a PC
How to update/recover your firmware
How to auto-calibrate your throttle
KO Tuning Software Walkthrough

Tuning Software

Always secure your bike on a stand before connecting or changing any tuning settings.


Please download the tuning software to start configuring your KO Moto system. Currently there are two options of tuning software: PC and Android. Both will allow you to configure your tune the way you would like. We’ve found Android devices are easier to connect since no dongle is needed – the app connects directly via Bluetooth. If you are using a PC, you will need to use either the hardwired dongle or Bluetooth wireless connector dongle, both of which are included with your purchase. 


IMPORTANT: Make sure no other devices within 20 feet have Bluetooth enabled as they can interfere with the connection.


BETA APPS NOW AVAILABLE!

KO has just released public beta versions of the existing Android app and the highly anticipated iOS app. We've been testing these apps extensively and helping KO to reach Version 7 ahead of public release. And let us tell you, these apps make setup and tuning a breeze!
This is the fastest way to get your KO-equipped bike up and running, but please remember these apps are in public beta, so you might encounter some bugs. If you run into any issues, send us an email along with screenshots or video captures and we’ll pass it along to KO.

Firmware Updates

The firmware files for Nano, Pro-Series, and Factory Spec controllers are all the same. The only difference will be the voltage change.


After updating your firmware, you will need to do an Auto Learn and calibrate your throttle as explained in the Tuning Setup Guide below. Please review the guide to understand what settings should and shouldn’t be changed before jumping in.


Select the firmware for your bike and voltage, then follow the setup instructions below.

Connecting to Controler

Updating Firmware

Firmware Change Logs

Connecting PC via Bluetooth (BT) dongle to KO Controller
Please make sure there are no other Bluetooth devices turned on within 20 feet as they could make it harder to connect to your controller. You should never need to do the pairing process again, so DO NOT press the pairing button again once you confirm you are paired, or try using a hard connection.

To pair your BT dongle to your controller:
  1. Plug BT dongle into PC.
  2. Turn the bike on, then press the pairing button on the end of the dongle.
  3. Blue indicator light on the dongle should turn solid, indicating it is paired.
  4. Open the KO Tuning Software on PC. In the Communication tab, set ComPort to COM3, set Baudrate to 19200, then set On/Off to “On.”
  5. Battery voltage and data count should be live (below RPM gauge). If so, you are successfully connected. If not, you are likely paired to a different nearby device – try to pair again.

Connecting PC via hardwire dongle to KO Controller

To pair to your controller via hard connection:
  1. Locate the small black 5-pin connector on the KO controller harness. It should be easy to find as it won’t be connected to any plug.
  2. Plug the hardwire dongle into this connector.
  3. Turn on the bike.
  4. Plug the USB side of the hardwire dongle into your PC.
  5. Open the KO Tuning Software on PC. In the Communication tab, set ComPort to COM3, set Baudrate to 9600, then set On/Off to “On.”
  6. Battery voltage and data count should be live (below RPM gauge). If so, you are successfully connected.

Connecting Android and iOS apps via Bluetooth
We’ll have a walkthrough for the apps once they are out of beta testing. Until then, please contact us if you have any trouble using the app.
ko app showing upgrade and recovery options
Note: To update your controller firmware, you will first need to download the KO Tuning Software for PC and connect to your controller via BT or hardwire dongle.

Updating via PC
Once your PC and controller are connected, navigate to the Controller Parameters section of the KO Tuning Software. At the far right side of the menu, you will find two methods for updating your software: Upgrade and Recovery.
  • Use Recovery if this is your first time updating this bike’s firmware. This will fully upgrade the firmware and install a baseline tune developed by KO which we will refine later in the setup process.
  • Use Upgrade if you have already developed a tune for this bike. This will update the firmware but leave the existing tune intact. You should only use this option after you’ve refined the bike’s tune and have it running with no issues, so that you don’t lose that tune during the firmware update process.
You will hear a beep letting you know the update is complete.

Updating via App

Coming soon


This is a running log of firmware changes, unedited, straight from KO.

9/12/2022 – 60V & 72V RS MOTOR UPDATES
Updated throttle response which improves delay on throttle at low dc and gives a better level of control for stunt riding (Work in progress - more updates to come).
  • Set Follow to EABS and adjust StopBackCurr and MaxBackCurr to adjust the level of braking. MaxBackCurr should always be higher. We would suggest setting this to 20 and 25 respectively initially just to test and adjusting from there.
  • Pole Pairs should be set to 4
  • Set Phase and MaxLineCurr according to your battery specifications
Stock Battery Recommended
  • MaxLineCurr - 90A or lower
  • MaxPhaseCurr - 520 or lower
ByPass Battery Recommended
  • MaxLineCurr - 140A or lower
  • MaxPhaseCurr - 520 or lower
3RD Partry Battery
  • As per battery specs - email us or contact us on discord if you aren't sure.

RPM Adjustments
For stunt riding we have found a parabolic curve gives the best results. Start at around 75 on 500RPM and build up to 100 at around 2000RPM. Keep at 100 until 4500 RPM then slowly drop off. This is just an indication and should be used as such. Feel free to tweak these adjustments to however you like them. If you need tuning support please email us for the discord link, or hop on discord any message any KO-Moto staff.

As with any firmware update please allow yourself time to get used to the changes and ride safely.

Tuning Setup

📲 📲 KO MOBILE APP IS OUT NOW! (BETA) This app makes tuning even easier.


Your firmware comes with a generic standard tune that’s not specific to your bike. That means you’re going to need to do some basic tuning, and if you’re totally new to tuning an e-bike, it all might seem pretty intimidating, but there are really just a few settings you need to change to get out on the road.


We created this KO Setup Guide to get you a running and riding bike with minimal effort. We’ve done this hundreds of times, so we can tell you exactly what needs to be changed and what can be left alone. There are no special tools required here, just time and patience.


In a nutshell, we will be telling your new KO hardware how much power your bike has, when to use it, and how the throttle will control it. The result will be a serious power and performance increase that’s sufficient for 90% of riders out there. We will also explore fine-tuning for the power hungry people who want an absolute monster with a one-off custom tune.

  • You don’t need to change any settings except these. We’ve included breakdowns of every parameter and function of the KO Tuning Software in the next section below, but you only need to mess with those if you’re going to fine-tune your bike after initial setup.
  • You will need a way to elevate the rear wheel. The back wheel needs to be off the ground and stable enough to run the bike. Don’t have a stand? Grab a 5-gallon bucket or get yourself an e-bike maintenance stand.
  • For the time being, please tune on a Windows PC. KO plans to release an app to make this process easier in the future, but for now we’ve found using a Windows PC is the easiest way, using the included dongles to connect to the hardware.


If you have any questions at any point, contact us and one of our techs will be happy to help you out.


CAUTION: DO NOT set everything to the highest possible value and call it a day. It might be tempting, but doing this can cause serious damage to your bike, equipment, testing environment, and yourself, so don’t do it.


CAUTION: When connecting to the controller via Bluetooth, make sure no other devices within 20 feet have Bluetooth enabled as they can interfere with the connection. Always secure your bike on a stand before connecting or changing any tuning settings.

1 KO software showing firmware update screen
STEP 1: FIRMWARE UPDATE
After getting your KO parts installed and connecting your bike to the software, update your firmware to suit your configuration. We’ve written a separate guide for how to download the right firmware files and apply the update – find it in the section above.

STEP 2: THROTTLE CALIBRATION
After the firmware update, you will likely have an alarm go off. This is telling you to calibrate your throttle.

There are two ways to do this: automatic calibration or manual calibration where you set the throttle voltages yourself. We’ll cover manual calibration in a later step – auto-calibrating is by far the easiest way. Automatic throttle calibration takes hundreds of measurements from the throttle’s internal hall sensor to ensure smooth response through the throttle’s entire range.

For this step, you will need to have your bike’s back wheel off the ground. Don’t have a stand? Grab a 5-gallon bucket or get yourself an e-bike maintenance stand.

CAUTION: You must upgrade your firmware before calibrating the throttle!
  1. With the wheel off the ground and the key turned off, twist the throttle all the way back, then turn the bike on with your other hand. The bike is not going to take off!
  2. You will hear two beeps letting you know the throttle is in calibration mode.
  3. Moving slowly and smoothly, completely close and completely open the throttle a total of 5 times. You will hear pairs of beeps during this process.
  4. After the 5th time, you will hear a single beep (might sound like a third beep) letting you know the calibration process is complete.
  5. Turn the bike off. The throttle is now automatically calibrated, and the bike will be live the next time you turn it on.
After auto-calibrating the throttle, move to Step 3.

3 KO software showing Line and Phase Current settings

STEP 3: LINE AND PHASE CURRENT

In the Controller Parameters tab, Max Line Current (LC) and Max Phase Current (PC) essentially determine the maximum power your bike will have on tap at any time. You might need to widen your window to see these fields.


You will need to set LC and PC values manually based on your battery configuration:


  • If you are using a stock bypassed battery, use 90 Max Line Current and 520 Max Phase Current.
  • If you are using any other battery, use 180 Max Line Current and 600 Max Phase Current.

CAUTION: Setting everything to the highest possible number will cause serious problems, so don’t do that!

4 KO software showing Low Voltage Protection setting

STEP 4: LOW VOLTAGE PROTECTION

Staying in the Controller Parameters tab, Low Voltage Protection saves you from draining your battery past its limits. This is set by default based on which firmware you installed, however we suggest using limits that are higher than the defaults for added peace of mind.


The Low Voltage Protection values we use for our bikes are:

  • For 60V batteries: 48.5V
  • For 72V batteries: 58.5V

These values are correct for both OEM and aftermarket batteries.

5 KO software showing Throttle Response Curve setting

STEP 5: THROTTLE CURVE

Moving to the Controller Functions tab, ThrottleResp defines the throttle curve. Sport delivers more aggressive throttle response, Eco is less aggressive, and Line (default) is a great happy medium. We suggest trying Line first.


NOTE: "Eco" throttle mode will limit Max Line Current (Step 3) to 150.

6 KO software showing Eco Mode settings

STEP 6: ECO MODE

Staying in the Controller Functions tab, the settings found in the MidSpeedParas section determine how your bike will perform when switched into ECO/EP Mode using the physical switch on your handlebars.


Thanks to your KO hardware, you now have full control over ECO/EP Mode. This allows you to define a less aggressive tune that you can enable at the flip of a switch for tighter trails, test rides, or maximizing range.


This only involves setting a rev limiter (MidSpeed) and defining what percentage of the bike’s total power will be on tap in this mode (LineCurrRatio, PhaseCurrRatio). The latter two settings allow a given percentage of the Max Line Current and Max Phase Current from Step 3 to govern the bike’s power, while MidSpeed sets a hard RPM limit within ECO/EP Mode.


You don’t have to do both – you can dial back the power while keeping the full rev range, or set an RPM limiter while still pushing full power. It’s all up to you. We like to use ECO/EP Mode on tighter trails, so we use the following values which give our bikes about 60-65% power output and much lower RPMs:

  • MidSpeed: 5000
  • LineCurrRatio: 60
  • PhaseCurrRatio: 78

These settings are totally up to you in terms of how you want to use ECO/EP Mode, so feel free to return to this step after test riding if you want to make adjustments.

7 KO software showing Auto Learn setting

STEP 7: AUTO LEARN

Moving to the Motor Parameters tab, at the right side of the menu is a purple button labeled Auto Learn. This will calibrate the motor to the controller. We recommend doing this regardless of which motor you have.


With the rear wheel lifted securely off the ground, click the Auto Learn button. Your controller will beep twice and a message will appear on the top of your PC gauges. At this point you will need to twist the throttle all the way and hold it until the motor stops on its own. You will do this twice or until Auto Learn is complete.

8 KO software showing AN and LM wave type settings

STEP 8: AN & LM

Staying in the Motor Parameters tab, AN and LM together adjust the motor’s wave type. You shouldn't ever need to adjust LM based on our experience, but you will need to adjust AN depending on what motor you are using.


  • If you’re using an OEM motor, set AN to 6. Leave LM alone.
  • If you’re using a KO RS motor, set AN to 14. Leave LM alone.
9 KO software showing Current Coefficient settings

STEP 9: CURRENT COEFFICIENT

The last two steps will likely need to be revisited after test riding to get everything just right.


We’ve reached the most complex setting we’ll be adjusting: Current Coefficient (CC). You can choose to take this even further for even more power, but only if you’re comfortable doing so – we’ll cover that option later on.


Current Coefficient works alongside Max Line Current and Max Phase Current (from Step 3) to control overall power output at specific RPMs. The goal here is to achieve linear power delivery and a smooth-running motor throughout the entire rev range. This will probably feel pretty familiar if you’ve tuned a car before, but don’t worry if you haven’t.


These settings will get you out on a test ride, but there might be room for improvement on your specific setup. If your motor jitters or isn’t smooth at any point in the rev range, make some minor adjustments and test ride again.

  • From 500-2000 RPM, most bikes making decent power can bump all the way up to 100. Note that for higher-power applications, 100 will result in too much power too soon, making the bike too sensitive. To set this value: start at 500 RPM with a value of 70, and increase +10 until you get to 2000 RPM. At 2000 RPM you should be at a value of 100.
  • From 2500-5000 RPM, start at 2500 with a value of 100 and decrease value -5 until you get to 5000 RPM. At 5000 RPM you should be at a value of 75.
  • From 5000-7500 RPM, set all values to 75.
  • From 8000-9000 RPM, start at 8000 with a value of 70 and decrease the value -15 until you get to 9000 RPM. At 9000 RPM you should be at a value of 40.

If you have any questions here, contact us and one of our techs will be happy to help you out.


With a good baseline set, you’re ready for a test ride!

KO test ride

STEP 10: TEST RIDE!


It’s finally time to test ride the bike and see how it feels. If the motor is nice and smooth at all RPMs, you’re good to go. But if you notice jittering or roughness anywhere in the rev range, take note of what RPMs the problem is happening at, and go back to Step 9 and decrease the values within that range in increments of 10. In our experience, increasing values will rarely fix a jittering issue – it’s always best to start by lowering them.


If your motor isn’t smooth The AN value (Step 8) may need to be decreased if your motor is jittering or not pulling through the power range smoothly, particularly if you have increased your Line Current and Phase Current from where we set them (Step 3). As with all settings, if you need to reduce AN we suggest changing it slowly, one unit at a time instead of jumping down.

11 KO software showing Speed Pulse setting

STEP 11: SPEED PULSE

The final setting we’ll be changing is found within the Controller Functions tab. SpeedPulse calibrates your speedometer, so if you notice your speedometer is inaccurate on the test ride, this is where you can fix it.

  • Increasing SpeedPulse will increase MPH readout
  • Decreasing SpeedPulse will decrease MPH readout

There is no set number here because your bike’s gearing, wheel size, and tire choice all influence speedometer inaccuracies.

KO fine tuning

Pat yourself on the back there partner you done souped up your stallion

Congratulations! At this point, you should have a riding bike that’s performing noticeably better than it was before you slapped all that KO tech in there. If you have any questions at any point while setting up your KO hardware, or it’s just not performing the way you expected, contact us and one of our techs will happily help you out.

STEP 12 (OPTIONAL): FINE-TUNING FOR MORE POWER

You probably noticed there’s a whole world of settings we didn’t touch on here. If you’re brave enough to dive into full custom tuning, we’ve broken down every parameter, function, and setting to the best of our knowledge in the next section below. Just remember to save your tune file before you make any major changes!


Please note that our ability to diagnose and support custom tunes will be limited the more you change, but we’ll still do our best to help if you get in a pickle. The final numbers will depend on your unique setup and power delivery goals.

  • We strongly suggest you get a smooth running bike using our baseline setup numbers and save the tune file before pushing anything for more power. That way you have a known good baseline you can fall back on if you ever need to start over again.
  • Be sure to take it slow. For example, you should never jump from 180 LC/600 PC to 340 LC/800 PC because that would cause the bike to run like actual butt. Remember, this is fine tuning!
  • We’ve said this several times because it’s important: Do not set everything to 100 and call it a day. We see people do this all the time and it will result in your motor jittering at best and could cause damage at worst, so please don't do that expecting to have max power across the board – that’s not how it works!


Now that we’ve established a known good baseline for the essential settings, if you’re planning to take your tune to the next level, here’s where to start.


Start by revisiting Step 3 and turning up Max Line Current (LC) and Max Phase Current (PC) if your battery can support it. Higher voltage batteries tend to allow higher values than what we gave in Step 3, which in turn could give you more power. You’ll then need to change your Current Coefficient numbers to ensure smooth power delivery. Optimal settings could vary drastically depending on many factors, including:

  • Max Line Current and Max Phase Current values
  • Voltage you are using (60V, 72V, or 84V)
  • Gearing changes
  • Weight of rider and accessories

For example, if you have low gearing designed for high-speed runs, your controller will have more load. Conversely, if you have higher gearing for trails and tighter courses, your controller will have less load. If you are running relatively low power (such as 150 LC/500 PC) you will have more room to push these numbers higher.


Manual throttle calibration

As we touched on in Step 2, there is a way to manually calibrate the throttle. This allows you to adjust how much deadband you have (how much the throttle can move without anything happening) or manually change throttle response at a certain point.


Voltages will be set manually on the Controller Parameters tab. Resting Throttle Voltage is the voltage registered when no throttle is applied. This number is displayed at the bottom left side of the KO Tuning Software on PC. This works alongside Threshold Low which tells the controller when to start applying power to your drive system (in volts). Resting voltage on OEM throttles is roughly 0.86V, and Threshold Low should usually be set to 0.10V more than resting, which in this example would be 0.96V. This gets more complicated when you introduce an aftermarket throttle – Domino, Magura, etc. all have different low and high inputs than OEM throttles. Throttles can be tricky, which is why we ALWAYS recommend doing auto-calibration!


Contact us with any questions. We'll see you on the trails!

Parameters, Functions, and Settings

Intro

Controller Parameters

Controller Functions

Motor Parameters

Other
In this section, our tech team has broken down every parameter, function, and setting in the KO Tuning Software in plain terms. Whether you’re curious what certain things do or you’re looking to fine-tune your bike to its fullest potential, we highly suggest you get your bike running smoothly with our Setup Guide and save out your tune file before making any additional changes.

Use the tabs above to walk through the corresponding tabs of the KO Software.

Basic settings

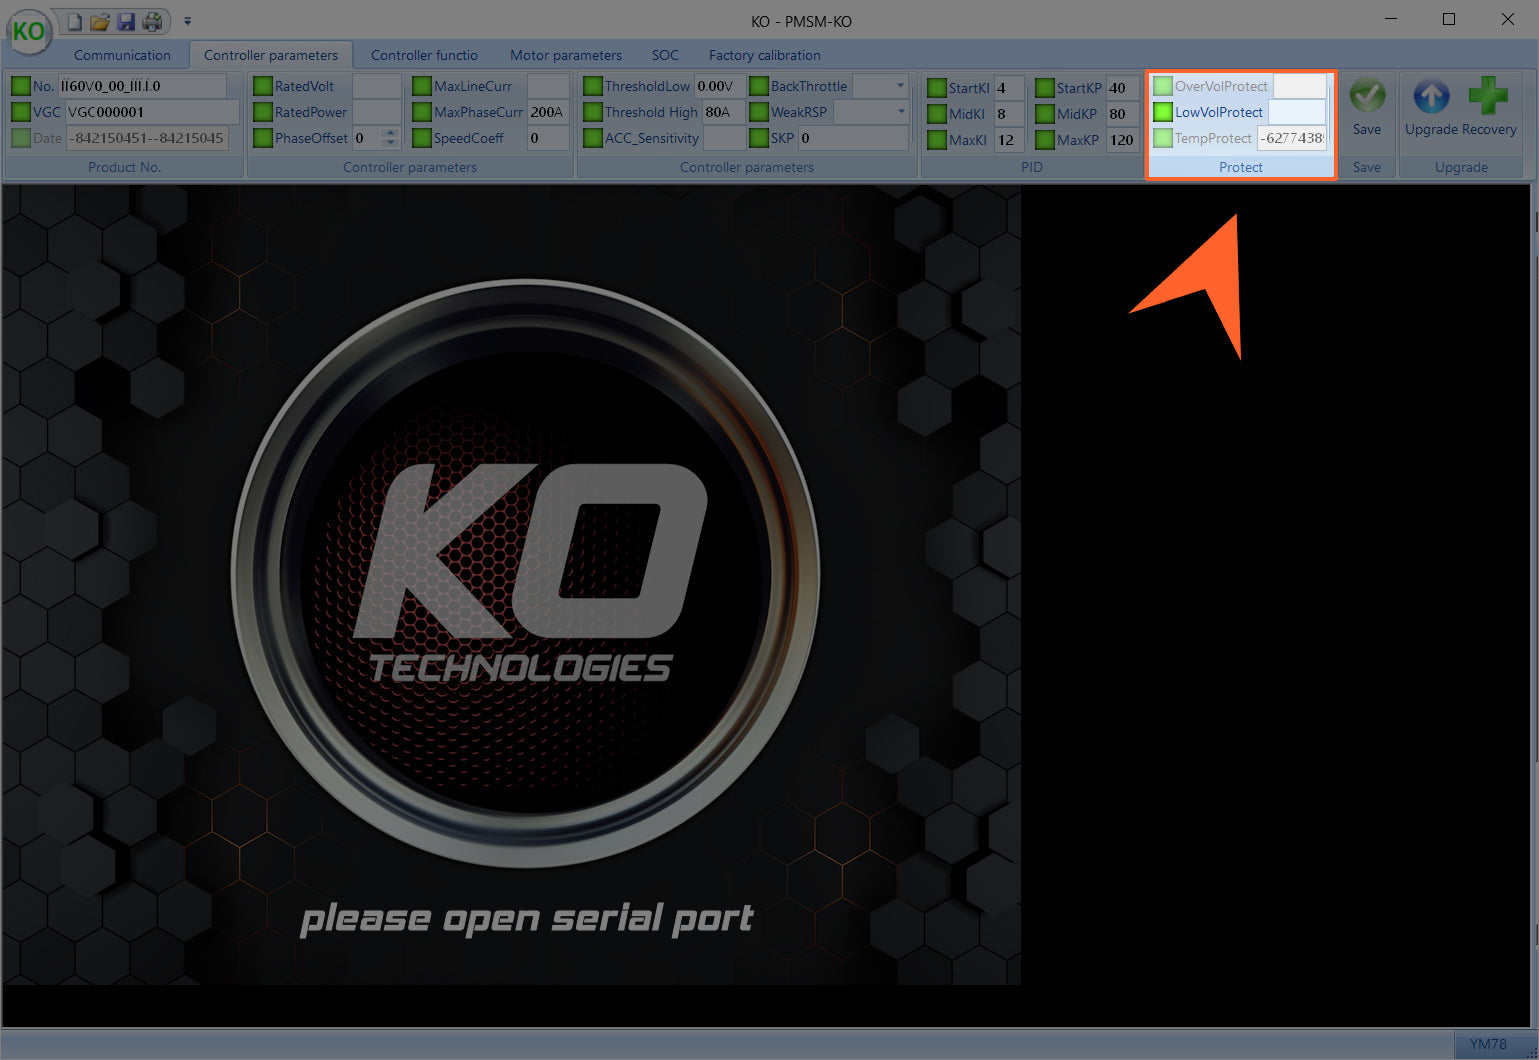
LowVolProtect (Low Voltage Protection)

Measured in volts. Should be set based on the manufacturer’s specifications for your battery. If you are using multiple different voltages, be sure to upload the correct firmware file to your controller. There is a different software for 60V and 72V batteries and the low voltage for each should be set accordingly. This setting should be verified anytime you do a firmware update.

MaxLineCurr (Maximum DC Current)

Maximum DC current into the controller from the battery. Measured in amps. Stock Sur Ron batteries should be set to 95A. Third-party batteries should be set to manufacturer’s specifications. Symptoms of an incorrect setting include a sudden slow down or a loss of power as the battery BMS either throttles or shuts power off to the bike completely. If that happens, turn this setting down and give the battery time to cool down before trying again. Maximum setting is 370A.

MaxPhaseCurr

Maximum phase current available to the motor. Measured in amps. Maximum setting is 800A.

Rated Voltage

Displays the intended battery voltage. This will depend on the update you have chosen (60V, 72V or 84V).


ThresholdLow (Minimum Throttle Input)

Adjusts the point at which the throttle will start to engage. Measured in volts. Use this to calibrate where the throttle comes on for your bike. We suggest making small changes and testing the effects with the back wheel lifted off the ground. You can adjust this value to add deadbanding to your throttle. Adding too much deadband may make the throttle unpredictable when accelerating. Adjust with care.

ThresholdHigh (Maximum Throttle Input)

Adjusts the point at which the throttle will be 100% open. Measured in volts. This sets the maximum voltage that can be supplied by your throttle. We suggest making small changes and testing the effects with the back wheel lifted off the ground. You can adjust this value to add deadbanding to your throttle. Adding too much deadband may make the throttle unpredictable when accelerating. Adjust with care.


Advanced settings and automatically calibrated values

CAUTION: Doing something wrong here could cause serious damage. Advanced users only.

ACC_Sensitivity (Throttle Sensitivity) 

This setting adjusts throttle sensitivity in a range from 5-224. A lower number will cause a less aggressive feel on acceleration. This value is set to 224 by default and should be left there.


BackThrottle (Negative Throttle Adjustment)

This setting slows throttle deceleration in a range from 0-7. This value is set to 0 by default. Raising the number will increase the time it takes for throttle deceleration to come into effect after dropping the throttle. Use this parameter to delay engine braking and allow the bike to freewheel for a short time.


OverVolProtect (Over Voltage Protection)

Automatically calibrated via firmware based on battery voltage. Cannot be changed.


Phase Offset

Automatically calibrated.


Rated Power

Automatically calibrated.


Rated Volt

Automatically calibrated.


Speed Coeff

Automatically calibrated.


SKP (PID Controller Response Time)

This setting changes PIDs to alter response time on the controller. Values available are 0-128 where 0 is fastest response time and 128 is slowest. The standard Sur Ron setting is 5 and we have never needed to change it.

Start/Mid/Max KI (Motor Vibration Control)

This setting controls motor vibration. In our experience, the stock setting is great for both KO and OEM motors and does not need to be changed.


Temperature Protection 

Thermal protection for the controller. Measured in degrees Celsius. When the controller reaches 80°C (176°F) it begins to throttle performance until the unit cools. At 90°C (194°F) the controller will cut power until the temperature drops to 80°C again. These are hard limits and are not adjustable.


WeakRSP (Magnetic Field Weakening)

Reducing this number effectively reduces the maximum RPM of the motor. The lower the number, the higher level of magnetic weakening is used, which means a setting of 0 is maximum field weakening. 0 is the default setting and we suggest leaving it there for a basic tune. For a more refined tune, or depending on your power goals, you may need to make a slight adjustment here to ensure smooth power output beyond about 4500 RPM. In that case try 2 or 3.

Note: Your bike’s brake sensors are used to activate regenerative braking. As such, settings related to brake sensors and regenerative braking will not work if you have previously cut your brake sensor wires.

Basic settings

Back Curr (Regenerative Braking Strength)

Settings found in this section adjust regen braking strength. Measured in amps. There are three settings in this section:

  • StopBackCurr – Sets the strength of the initial bite of regenerative braking. The higher the amps, the higher, stronger, and harsher regen braking will be. If the regen bite is too harsh when you roll off the throttle, lower this number. If you want a more aggressive bite, raise this number.
  • MaxBackCurr – Sets the maximum regen strength reached after the initial bite.
  • Backspeed – Not adjustable.


Brake (Brake Sensor Control) 

This setting allows you to turn the brake sensors on and off. There are several options to choose from:

  • Float Run – Keeps the motor going if brakes are used while throttle is engaged.
  • Float Stop – Cuts the motor if brakes are used while throttle is engaged. This is the way an OEM Sur Ron works.
  • Low + Floating Power Off – Not used
  • High + Floating Power Off – Not used
  • Invalid – Ignores the brake sensors completely and leaves you with strictly mechanical braking.​


Follow (Regenerative Braking Style)

There are several options to choose from:

  • Enable – Turns on regen braking.
  • Disable – Turns off regen braking.
  • Brake – Regen only happens when you use the brake.
  • EABS – Regen only happens when you close the throttle completely (stock Sur Ron functionality).


MidSpeed Paras (Eco Mode Speed and Power Adjustment)

Settings found in this section adjust the bike’s EP mode. We usually use Eco/EP Mode as a trail mode so these values are usually set to the following for us – if you want that functionality, start here and experiment: LineCurrRatio 60, PhaseCurrRatio 78, MidSpeed 5000. There are three settings in this section:

  • LineCurrRatio (Eco Mode Power Limiter) – Limits power in Eco Mode by reducing the maximum DC current set by MaxLineCurr in a range from 0-100%. In other words, this reduces maximum power by X percent.
  • PhaseCurrRatio (Eco Mode Phase Current Limiter) – Limits phase current in Eco Mode by reducing the maximum phase current set by MaxPhaseCurr in a range from 0-100%. In other words, this reduces maximum phase current by X percent.
  • MidSpeed (Eco Mode RPM Limiter) – Limits the maximum motor RPM in Eco Mode. If you want your bike to be governed in Eco Mode, possibly for other riders or for riding in speed limited areas, you can use this setting to set a speed limit based off motor RPM.

ThrottleResp (Drive Mode)

By changing the throttle curve, this setting allows you to put your bike one of three Driving Modes:

  • Line – Flat mode with a tame acceleration profile. Good for beginner riders.
  • Sport – Aggressive mode that delivers fast acceleration and snappy response.
  • ECO – Slow but efficient mode for conserving battery life while taking it easy. Not to be confused with the stock Sur Ron Eco Mode.

Advanced settings and automatically calibrated values

CAUTION: Doing something wrong here could cause serious damage. Advanced users only.

AccPara (Acceleration Control) 

This setting adjusts the aggressiveness of the acceleration control. 1 is slowest 8 is fastest. We have never needed to change this.


Analog Speedometer

Automatically calibrated.


BikeSensors

Set to option 5 to disable all sensors and set to option 1 to enable them. Includes brake and tip-over sensors.


CAN

Not used on Sur Ron.


Gear  

Set this to Default D. Other options are not used on Sur Ron.

LowSpeed Paras

The three settings found in this section are not used on Sur Ron.


Parking (Parking Speed)

We have never needed to change this.


Reverse Charging (Regenerative Braking)

Automatically calibrated.


Speedometer

Pulse speed from hall sensor. Default setting is Pulse. Other settings are not used on Sur Ron.


SpeedPulse (Speedometer Calibration)
This should be correct out of the box for a stock Sur Ron, but if your bike has wheel or driveline modifications, you will need to change this to calibrate the speedometer correctly. In that circumstance, our advice is to download a GPS speedometer app, then lower this setting by 4, see if your speed gets closer or further away from correct, and play with it until you get the right readout.

Basic settings

Direction (Motor Direction) This option changes the motor direction between CW (clockwise) and CCW (counterclockwise). 1 is the default position. Don’t change this.

Motor Temp (Motor Temperature Sensor Type) Automatically calibrated. What kind of temp sensor the motor uses. Sur-Ron is KTY84. The KO Moto Motor is KTY84. 

Position Automatically calibrated.

Rated power Automatically calibrated.

Rated voltage Automatically calibrated.

TempProtect (Motor Temperature Protection) Automatically calibrated.

Current Coefficient (RPM Power Adjustment) Adjust the torque delivered through an RPM range by limiting the amount of phase current available as a percentage. This will allow you to adjust the feeling of torque for the bike during initial acceleration and while the motor accelerates to its maximum RPM. The value used should be between 0-100. We would suggest for best results having a sensible smooth transition for road use and something a little more aggressive for dirt. An important note to make is that every drive train in every bike is slightly different you may find at a certain speed the bike will slightly shake or shudder at a high phase rating. If you find this occurs then the best way is to adjust the phase current limiter downwards by a factor of about 5-10%. you will also find this setting very useful to give you the level of torque at the start RPM range 500 +1000 so as to not make the bike feel too jerky.

Advanced settings and automatically calibrated values

CAUTION: Doing something wrong here could cause serious damage. Advanced users only.

AN (Magnetic Field Weakening Wave Type) This function is used to control motor vibration by changing the wave type used for magnetic field weakening using a value from 0-16. It is best to use a low number with a high-power system. For example, one of KO’s test bikes uses 300A DC in and 800 phase and the AN is set to 2 to limit motor vibration across the board. A stock Sur Ron would use a value of around 4. Adjust this setting to address vibration-related issues when vibration is present at all RPMs.

LM (Magnetic Field Weakening Wave Interval) This setting works in conjunction with AN to change the interval of the waves being sent. This also prevents motor vibration but should only be set after AN has already been adjusted and has not had the desired effect. We have never needed to change this one.

PolePairs Should be automatically calibrated. This reflects the number of pole pairs your motor is using.

Auto Learn

This will ask the controller to autodetect your bike’s motor using the hall sensor and encoder. If you want to use a third-party motor, you can use this function to set the position of the encoder. We would recommend getting in touch with us prior to doing this at support@gritshift.com.

Communication Tab

On/Off
Enables or disables app to connect to your bike.

ComPort
Allows you to select the com port type that your PC supports.

Baudrate
Connection type BT requires 19200 connection. Hardwire dongle uses 9600 connection.

Reset
Not used.

Skin
Choose the skin for the KO software.

Batch Setting
Not used.

SOC Tab

The State of Charge settings are for reflecting the correct state of battery charge when using a third-party battery. For more information, please contact us at support@gritshift.com.

Factory Calibration Tab

The settings in this section are for bench testing in a development environment and should not be changed by a regular user.

monogram-1-lg_cropped